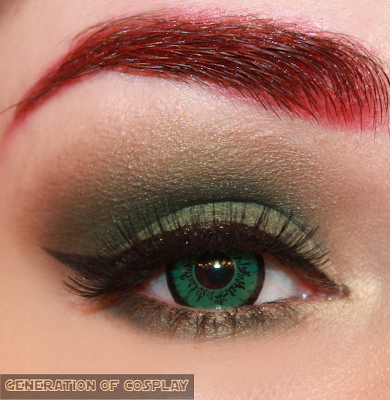
"Sure you can handle me, Summoner?" ❤
Hey, everyone! It's time for another makeup tutorial!
Cosplay makeup can be both really fun and very frustrating to do. If you know exactly what you want to do, it will make your cosplay look really great. But, if you have no idea what you are doing, you will want to pull your hair out! I have been really frustrated with Miss Fortune's makeup, because her splash art (and in game model) show her wearing an insane amount of makeup (eyeahdow in particular). I want my cosplay to be accurate, but I also don't want to end up looking like a $5 hooker. So, I've been looking for a middle ground with her makeup.
Today, I have a makeup tutorial for the makeup that I have been happy with so far. I decided to use green eyeshadow to add to the Christmas feel, but I toned it down with some neutral/brown eyeshadows. Oh, and you'll notice in the tutorial that I forgot to put my circle lenses in at the very beginning, so make sure you put them in before starting your makeup!

Products Used
- EOS Dolly Green Circle Lenses
- ELF Eyeshadow Primer
- Wet n Wild Palette (matte light brown eyeshadow, bronze eyeshadow)
- Lime Crime '' Palette (shimmery dark green, shimmery white-gold eyeshadows)
- Dolly Wink Liquid Eyeliner
- Mascara
- Ardel #105 Lashes
- Revlon Eyelash Glue
- Maybelline Instant Age Rewind Concealer 'Neutralize'
- Wet n Wild Full Coverage Foundation
- NYC 'Sunny' Bronzer
- MAC 'Riri Woo' Lipstick
Tutorial

1. Start off by priming your lids. This is super important if you're going to be wearing a lot of makeup!
2. With a fluffy brush, apply a light matte brown on your crease (or where you want your "crease" to be). This will help to blend out the green eyeshadow a bit later on.
3. With a dense flat brush, apply a shimmery deep green eyeshadow (the more Christmas-y the green, the better). Pack it on.
4. With a smaller flat brush, apply a shimmery pale gold eyeshadow on the inner corner. This will bring more light into your eyes; it helps to avoid the makeup being too dark. Blend it in slightly with the green.
5. Take the fluffy brush, and start blending the green eyeshadow into the crease. Blend, blend, blend!
6. Take a neutral brown/bronze/taupe eyeshadow and start applying it to the end of the green, just above the crease. This neutral brown will help to balance the harshness of the green eyeshadow and avoid making this look like hooker makeup. Blend, blend, blend!
8. Apply lashes. Because this eye makeup is so heavy, the lashes help to balance your eye shape. And it will make your eyes look bigger.
9. Clean up the lower lash line. Colors like green tend to have a lot of fallout. Wipe it up.
10. Apply a concealer on the lower lash line and blend it in!
11. Apply eyeshadow on your lower lash line. I mixed the green and brown and applied it on the lower lash line. Then added a bit more of the shimmery pale gold on the inner corner.
12. If you need, go back and blend anything else out or add a bit more green eyeshadow on your lid. Touch up anything as needed.
13. Since I'm wearing a red wig, I decided to fill in my brows red. If you need to do that, now would be a good time!


No comments:
Post a Comment